


Best DJI Osmo Action 6 Settings for Motorcycle Riding
Best DJI Osmo Action 6 Settings for Motorcycle Riding
The exact Pro Mode settings, ND filter picks, and color grading workflow to get cinematic POV footage on every ride.
The DJI Osmo Action 6 is a beast — a 1/1.1-inch sensor, variable aperture (f/2.0 to f/4.0), 4K120, and RockSteady 3.0 stabilization built into a camera you can strap to your chin. But none of that matters if the settings are wrong.
Most riders leave everything on Auto and end up with blown-out skies, jittery stabilization, and footage that looks like dashcam video. This guide fixes that. We'll walk through the exact settings that make your favorite motovloggers' footage look cinematic and smooth — plus the two gear upgrades that make the biggest visual difference.
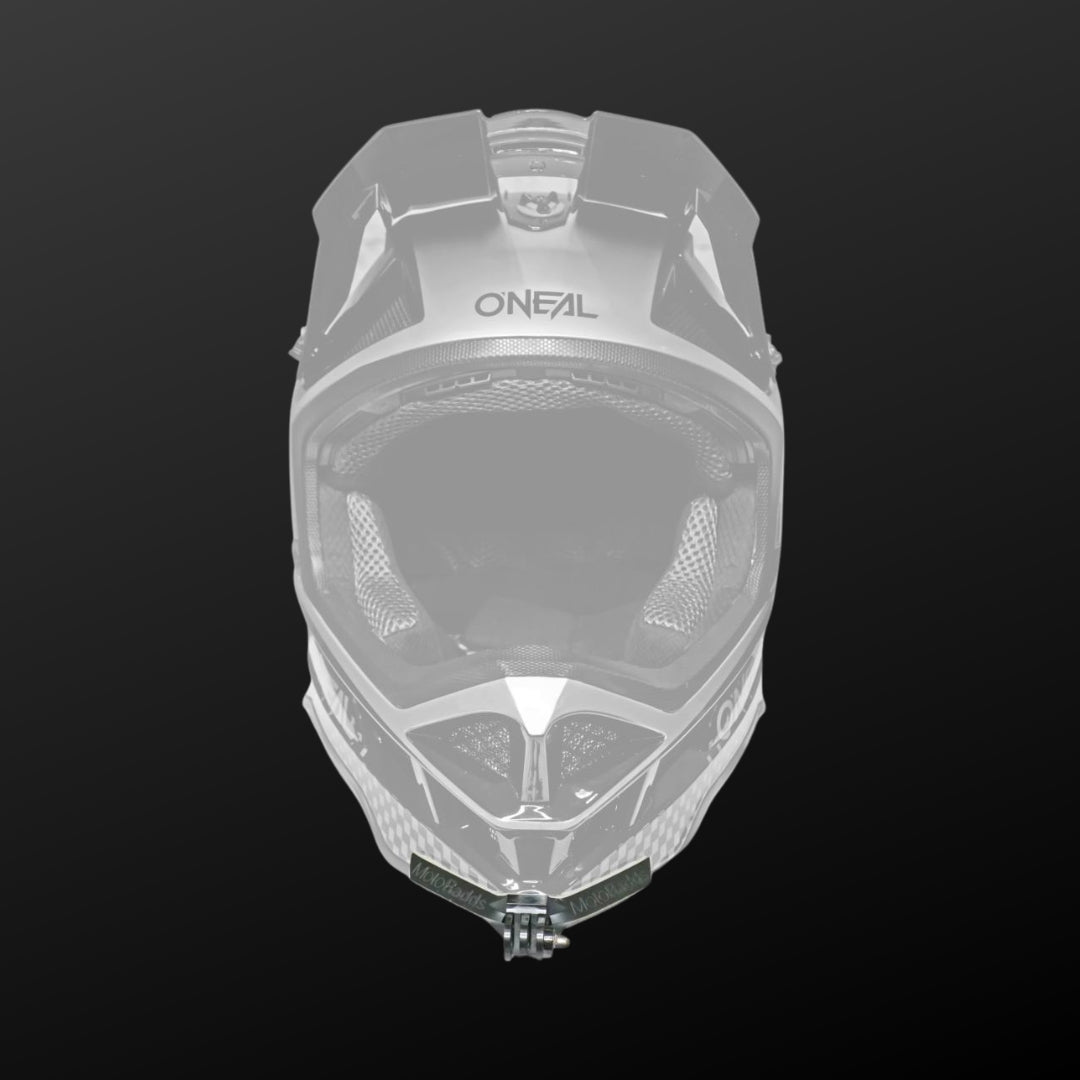
1. Chin Mount Setup — Getting the Best Angle
Before you touch a single camera setting, the mount has to be right. A chin mount produces the most natural, eye-level POV of any helmet position — it follows your head movement naturally and sits low enough to avoid wind drag. Side mounts skew the horizon, top mounts feel like drone footage, and chest mounts catch your arms more than the road.
Here's the install process we recommend with the MotoRadds FLEX Slim Chin Mount:
01 Pre-Shape the Mount
Bend the steel-core mount to match your helmet's chin curve. The steel wants to spring back, so put in a little extra bend near the tips to compensate for that tension. This prevents the edges from lifting over time.
02 Prep the Surface
Clean the chin bar with the included alcohol prep wipe. Then hit the area with a hairdryer or heat gun for 1–2 minutes. Warming the surface lets the 3M VHB adhesive flow into the texture of the helmet for a significantly stronger bond.
03 Apply — Center First
Press the center of the mount down firmly, then knead outward toward the tips. Small perimeter gaps are normal — close them by pressing from the opposite edge. Hold firm pressure for 60 seconds.
04 Attach the Hardware
Clip on the extension joint (this is what lets you angle the camera), then the quick-release plate, then mount your Osmo Action 6.
05 Dial in the Angle
This is the part most people get wrong. Point the camera back and upward — almost like it's aimed at the sky. It feels strange, but because your chin angles downward while riding, this produces the most natural, eye-level forward POV in your footage.
Find Your Exact Helmet Mount
The MotoRadds FLEX Slim fits over 2,000 helmets — Shoei, AGV, Arai, HJC, Bell, Scorpion, and more. Steel-core bend with 3M VHB adhesive for a flush, rattle-free seal.
Browse Chin Mounts →2. Every Camera Setting, Explained
The Osmo Action 6 ships in Auto mode. That's fine for handing the camera to your friend at a barbecue — but for motorcycle footage, you need Pro Mode. These are the exact settings we use. Go through them in order; each one builds on the last.
| Setting | Value | Why |
|---|---|---|
| Mode | PRO | Tap the slider icon on the home screen. This unlocks manual control over everything below. |
| Resolution | 4K | The sweet spot between quality and file size. The Action 6 can shoot 8K, but 4K gives you smoother stabilization and smaller files for editing. |
| Frame Rate | 24fps | The cinematic standard. 24fps produces natural motion blur that makes footage feel filmic, not "video-ish." Bump to 60fps only if you plan to use slow-motion. |
| Aspect Ratio | 16:9 Landscape | Standard widescreen. If you're shooting for TikTok or Reels, use a vertical mount adapter instead of cropping — you keep the full sensor area. |
| Stabilization | RockSteady (Std Dewarp) | RockSteady 3.0 is excellent for riding. Avoid the higher stabilization modes — they crop the image aggressively and can introduce warping at speed. Set Stab Scenario → Sport for best results on a bike. |
| Exposure | M (Manual) | On the Exposure panel, switch from Auto to M. This is the single most important change. Auto exposure constantly adjusts as you ride through sun and shade, creating that distracting brightness "pumping" effect. Manual locks it down. |
| Shutter Speed | 1/50 or 1/120 | Use 1/50 at 24fps (the "double the frame rate" rule for cinematic motion blur). Use 1/120 at 60fps. This is where ND filters become essential — see section 3. |
| ISO | 100 | Keep it as low as possible for the cleanest image. If your ride includes tunnels, tree cover, or dusk, allow 100–800 and let the camera adjust within that range. |
| White Balance | AWB | Auto White Balance handles the constant lighting shifts on a ride (sun, shade, tunnels) without you needing to adjust mid-ride. Consistent results. |
| Color Profile | D-Log M 10-Bit | D-Log M captures the full 13.5 stops of dynamic range. Your footage will look flat and washed out on camera — that's intentional. It gives you maximum control in editing. If you don't plan to color grade, use Normal 10-Bit instead. |
| Variable Aperture | Classic / Fixed (f/2.8) | The name changes with firmware updates, but both options lock aperture at f/2.8 — the sharpest setting for this lens. |
| FOV | Standard (Dewarp) | De-warped removes the fisheye distortion and gives your footage a natural, cinematic perspective. Wide is useful if you need more coverage, but it looks less professional. |
| Sharpness | -2 | Found under Image Adjustment → Custom. Lowering in-camera sharpness prevents digital artifacts. You can always add sharpness in post — you can't remove it. |
| Noise Reduction | -2 | Same location. The camera's built-in NR tends to smear fine detail. Dialing it back preserves texture in asphalt, trees, and distant objects. |
| Bitrate | High | Swipe down → tap the bolt icon → scroll to Bitrate → set to High. More data per frame means more detail for editing, especially in fast-moving scenes. |
3. ND Filters — Why Your Footage Looks Washed Out Without Them
Here's the problem nobody talks about when they recommend manual exposure: if you lock your shutter speed to 1/50 on a sunny day, the sensor gets flooded with light. The image blows out. Highlights clip. The sky turns into a white wall. Your camera can't physically let in less light at f/2.8 and 1/50 without help.
That help is an ND filter.
ND (Neutral Density) filters are essentially sunglasses for your lens. They reduce the amount of light hitting the sensor without affecting color, which lets you keep that slow, cinematic shutter speed even in bright conditions. Without one, you're forced to either crank the shutter speed up (which kills motion blur and makes footage look jittery and "GoPro-ish") or leave it on Auto (which defeats the entire purpose of Pro Mode).
This is not a nice-to-have. It's the difference between footage that looks like a security camera and footage that looks like it belongs in a riding documentary. Every professional motovlogger and filmmaker uses ND filters — and the Osmo Action 6's variable aperture makes them even more effective because you're starting from a controlled, fixed aperture.
Which Filter for Which Conditions
If you only buy one, get the ND32 — it covers the most common riding conditions. But a full set (ND8, ND16, ND32, CPL) means you're covered from dawn to dusk without ever compromising your shutter speed.
MotoRadds ND Filter Pack for DJI Osmo Action 6
All 4 filters (ND8, ND16, ND32, CPL) precision-cut for the Osmo Action 6. Swap in seconds, no alignment fuss. This is the single biggest upgrade you can make to your footage quality.
Shop ND Filters →4. Color Grading for Riders (The Easy Way)
If you're shooting in D-Log M, your footage will look flat and desaturated straight off the camera. Don't panic — that's the whole point. All that dynamic range is sitting there waiting for you to shape it. Here's the fastest way to go from flat to cinematic.
01 Apply a LUT
A LUT (Look-Up Table) is a one-click color transform. Search for free D-Log M LUTs online — there are dozens of great options. In your editor, drop it on as an adjustment layer. This gets you about 80% of the way to a finished look.
02 Balance Exposure
Motorcycle footage constantly fights the bright sky vs. dark road problem. Pull highlights down about 20 points and lift shadows slightly. This brings back cloud detail in the sky without losing texture in the asphalt.
03 Add Punch
Bump contrast by +15 and saturation by +10. For a cinematic feel, pull a subtle orange-and-teal split tone using your curves or HSL panel — orange in the highlights (warm road, skin tones) and teal in the shadows (sky, pavement).
Recommended Editing Software
DaVinci Resolve — free, industry-standard, and has the best LUT and color grading tools of any editor. It's free and handles GP-Log and D-Log M beautifully. CapCut is a great free option for mobile and desktop with easy LUT import if you need a fast turnaround. Premiere Pro works well if you're already in Adobe's ecosystem.
5. Gear That Actually Makes a Difference
You don't need a lot of accessories. But these four close the gap between "hobbyist clips" and footage you're genuinely proud of.
Chin Mount
The foundation of everything. A proper chin mount gives you stable, centered, eye-level POV that no other mounting position can match. The MotoRadds FLEX Slim uses a steel core with 3M VHB adhesive — it bends to fit your exact helmet shape and stays locked in at speed.
ND Filter Pack
We covered this above, but it bears repeating: ND filters are the single biggest visual upgrade you can make after getting your settings dialed. They're the reason pro footage looks smooth and cinematic while most YouTube riding clips look harsh and blown out. A full set of four covers every condition from dawn to high noon.
Screen Protector
The Osmo Action 6's rear touchscreen sits millimeters from your helmet chin bar. One bump during installation or a piece of road debris and you're looking at a scratched display. A tempered glass protector costs almost nothing and saves you a repair.
Vertical Mount Adapter
If you post to TikTok, Instagram Reels, or YouTube Shorts, a vertical adapter lets you shoot portrait orientation using the full sensor — instead of cropping a 16:9 frame down to 9:16 and losing two-thirds of your resolution.
The Full MotoRadds Setup
Chin mounts, ND filters, screen protectors, adapters, and more — everything built specifically for riders who care about their footage.
Shop All Mounts & Accessories →TL;DR — Quick Settings Cheat Sheet
- Mode PRO
- Resolution / Frame Rate 4K / 24fps (60fps for slow-mo)
- Aspect Ratio 16:9 Landscape
- Stabilization RockSteady 3.0, Standard Dewarp, Sport scenario
- Exposure Manual — 1/50 shutter, ISO 100
- ND Filter ND32 (sunny) / ND16 (overcast) / ND8 (golden hour)
- Color D-Log M 10-Bit (grade in post) or Normal 10-Bit (ready to post)
- Aperture Fixed at f/2.8
- FOV Standard (Dewarp)
- Sharpness / NR Both at -2
- Bitrate High
Dial these in once, mount up, and ride. The camera does the rest.
Want to capture other exciting POVs? Check our full mount collection — we have a mount for every POV on your motorcycle.
This guide is maintained by the MotoRadds team and updated as DJI releases firmware changes. Last updated April 2026.


Leave a comment